Working with acrylic can be a lot of fun, whether you’re building something for your home or making a cool art project. But sometimes, after you cut it, the edges can look a bit rough. Getting those edges smooth and clear is key to making your project look really professional. This guide will walk you through how to polish acrylic edges, step-by-step, so you can achieve that super clear, almost glassy finish.
Key Takeaways
- Start by cleaning your acrylic thoroughly and checking the edge for any rough spots or imperfections.
- Use sandpaper, starting with a coarser grit and moving to finer ones, always sanding in one direction and using water to keep things cool.
- Buffing with a soft wheel and a special compound is the next step to get rid of the frosted look from sanding and create shine.
- Advanced methods like flame polishing or diamond polishing can give a super smooth, clear edge, but they require more practice and specific tools.
- Always remember to wear safety gear like goggles and gloves, and make sure your workspace is well-ventilated, especially when using heat or chemicals.
Preparing Acrylic Edges for Polishing
Before you even think about making those acrylic edges shine, a bit of groundwork is needed. It’s like prepping a canvas before painting; you wouldn’t just slap paint on a dirty surface, right? The same goes for acrylic. Getting the edges ready is the first big step towards that crystal-clear finish everyone wants.
Initial Cleaning Of Acrylic Surfaces
First things first, give your acrylic piece a good clean. You want to get rid of any dust, fingerprints, or manufacturing residue. A soft, lint-free cloth and some mild soap and water usually do the trick. Just make sure to rinse it thoroughly and dry it completely. Any grit left behind can cause scratches later on, and nobody wants that. A clean surface is the foundation for a flawless polish.
Understanding Edge Imperfections
Take a close look at the edges you’ll be working on. Are they rough from a saw cut? Are there small chips or unevenness? Maybe they look a bit hazy already. Different cutting methods leave different marks. For instance, laser cutting can leave a smooth edge, but it might still have a slight discoloration or a very fine kerf mark that needs attention. Knowing what you’re dealing with helps you pick the right tools and techniques.
Here’s a quick rundown of common edge issues:
- Saw marks: Visible lines or ridges.
- Chips: Small pieces broken off.
- Unevenness: High and low spots along the edge.
- Haze: A general lack of clarity, often from cutting.
Assessing Material Properties
Acrylic, or polymethyl methacrylate (PMMA), is a pretty forgiving material, but it does have its quirks. It can scratch easily, and it melts when it gets too hot. This means you need to be mindful of the pressure you apply and the heat generated during the polishing process. Understanding that it’s sensitive to heat is key to avoiding melted edges or further damage. This knowledge will guide your choices in sandpaper grits, buffing speeds, and polishing compounds. It’s all about working with the material, not against it.
Working with acrylic requires a gentle but firm approach. Too much force or heat can quickly turn a promising project into a frustrating mess. Patience and careful observation are your best allies here.
Mastering The Sanding Technique
Getting a smooth, clear acrylic edge starts with a solid sanding technique. Sanding isn’t just step one—it’s the core of the whole process, so rushing or skipping grades means a cloudy finish later. Here’s what you need to know to actually get those edges ready for a great polish.
Selecting Appropriate Sandpaper Grits
Always start with a more abrasive sandpaper before working your way up to finer grits—this is the only way to truly erase the marks from cutting or sawing acrylic. Typical progression looks like this:
| Sandpaper Grit | Use Case |
|---|---|
| 120/180 | Removes deep scratches, initial shaping |
| 400 | Smooths after coarse sanding |
| 600 | Final finish before polishing |
- Begin with 120 or 180 grit to knock down any rough spots or tool marks.
- Shift to 400 once the edge is free of major defects.
- Finish with 600—this prepares the surface for a serious shine later.
You can also get creative and use wet/dry sandpaper for the finer grits.
Implementing Wet Sanding For Heat Control
Acrylic gets hot during sanding, and heat can literally melt the edge if you aren’t careful. Wet sanding is the trick for dealing with this:
- Keep a spray bottle of water handy—wet the edge and paper as you work.
- Work in short passes, dipping your sandpaper in water often.
- If the acrylic starts to gum up or stick, pause and let it cool.
Wet sanding controls friction and keeps the edge smooth. If the acrylic starts to feel tacky or the edge turns white, let it cool down before continuing.
Achieving Uniformity Through Directional Sanding
Consistency counts more than brute force here. Sanding in one direction (rather than back and forth or in circles) helps keep scratches linear and easier to buff out.
- Move either side-to-side or back-and-forth, but pick one and stick with it for each grit.
- Apply even, gentle pressure—just enough to keep the sandpaper in contact but not so much that it heats up.
- Check your progress under good light, making sure the edge is an even, frosted tone before moving on.
Sometimes, if you want extra shaping or to prep your edges further, considering routing or beveling steps before sanding can save a lot of time later on.
Sanding is slow work, but the more time you spend here, the clearer and more professional your acrylic edge will look once polished.
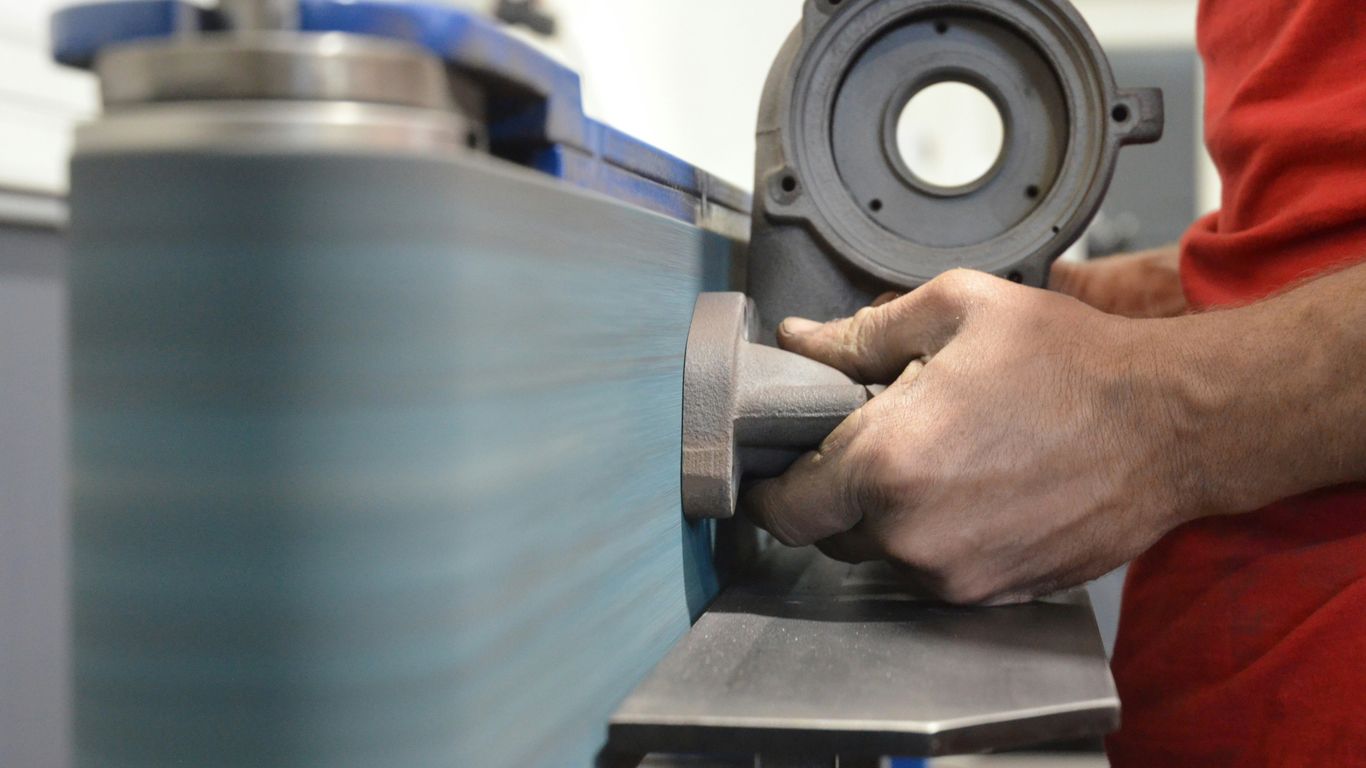
Achieving A Glossy Finish With Buffing
After you’ve smoothed out the edges with sanding, the next step is to bring out that crystal-clear shine. This is where buffing comes in. It’s the part that really makes the acrylic look like glass.
Choosing The Right Buffing Wheels
Not all buffing wheels are created equal, and for acrylic, you want something soft. Think cotton or muslin. These materials are gentle enough not to damage the plastic but firm enough to work with polishing compounds. A clean wheel is super important; any dirt or grit can easily scratch your work, undoing all that sanding you just did. If you’re unsure about the best type for your project, looking into professional edge polishing services can give you a good idea of what professionals use.
Applying Polishing Compounds Correctly
Polishing compounds are basically fine abrasives mixed with a waxy or oily base. You need a compound specifically made for plastics or acrylic. You don’t need a lot; a thin layer applied to the buffing wheel is usually enough. Too much compound can make a mess and doesn’t necessarily speed up the process. The goal is to let the compound and the wheel do the work.
Controlling Friction For Optimal Shine
This is probably the most critical part of buffing. Acrylic can melt if it gets too hot. You need to keep the friction under control. That means not pressing too hard and keeping the acrylic moving steadily across the spinning wheel. A light, consistent pressure is key. You’ll want to move the acrylic edge back and forth or in a circular motion to ensure even polishing and prevent one spot from getting too hot. If you feel the acrylic getting warm, pull it away for a moment to let it cool down. It’s a bit of a balancing act, but once you get it right, the results are fantastic.
- Apply a small amount of polishing compound to the wheel.
- Gently press the acrylic edge against the spinning wheel.
- Keep the acrylic moving to avoid overheating.
- Work until the edge is clear and glossy.
Overheating is the enemy of a good polish. Always err on the side of caution and keep the acrylic moving. A little patience goes a long way in achieving that perfect, glass-like finish without damaging your piece. You might also consider shaping the edges before polishing for a more refined look.
Advanced Polishing Methods
Getting smooth, professional edges on acrylic isn’t just about sanding and buffing—sometimes the project calls for advanced techniques. Here we go a bit deeper into flame polishing, diamond polishing, and laser cutting. Each method has its own purpose depending on your acrylic type, edge shape, and the level of clarity you want.
Flame Polishing For Smoothness
If you need a quick way to make edges shine, flame polishing could be what you’re after. With a controlled gas flame, you melt the top surface of the acrylic just enough to erase small scratches and give it a noticeable gloss. It works best for:
- Curved or awkwardly shaped acrylic pieces that can’t go through a motorized polishing machine.
- Thinner sheets where traditional sanding might be tricky.
- Small, decorative items that need a subtle shine.
Flame polishing is fast, but keep the flame moving. Too long in one spot and you risk melting or warping the edge entirely. More details on how flame works are found in this summary on using a controlled gas flame.
Diamond Polishing For Precision
For that ultra-clear, glass-like finish, diamond polishing is the standard. A precision machine, fitted with a diamond-tipped tool, slices away any imperfections to create a flawless edge. Here’s when it’s a smart option:
- Projects where the edge is highly visible—think awards, retail displays or furniture.
- Straight-edged pieces that need absolutely clear, even borders.
- Heavy-duty or thick acrylic where manual methods don’t cut it.
The table below sums up when each advanced method is best used:
| Method | Best For | Level of Clarity |
|---|---|---|
| Flame Polishing | Curves, thin sheets, quick gloss | High |
| Diamond Polishing | Straight, visible edges | Ultra-high |
| Laser Cutting | Precision shapes, sealed edges | High (often needs no extra polish) |
If you want a professional-level finish, sometimes bringing in help is the way to go — professional acrylic polishing services have both the right equipment and experience for tricky jobs.
Laser Cutting For A Polished Edge
Laser cutting isn’t just about creating shapes; it can leave a clean, shiny edge right out of the machine, especially on clear acrylic. The heat from the laser slightly melts the edge as it cuts, leading to a sealed and sometimes glossy finish.
- Most laser-cut acrylic will already look shiny; some might need just a light touch-up with a polishing compound.
- Works best for straight lines, geometric designs, and intricate details that are tough with sanding or flame.
- Great for projects where speed or batch production is important.
Using the advanced polishing method that fits your project’s needs saves time and prevents wasted materials. Trying these techniques on a scrap piece first can help you figure out the right approach without risking your final piece.
Essential Safety Precautions
Paying attention to safety while polishing acrylic isn’t just a good idea—it matters for your health and the end result. Let’s run through what matters most when keeping yourself safe during this process.
Eye Protection During Polishing
Eye injuries can happen quickly once sharp tools or fast equipment are involved. Small bits of acrylic or buffing compounds can fly into your eyes with surprising force, especially when working with power tools or a rotary buffer.
- Wear a full-face shield or safety glasses: Shields are ideal for jobs with more flying debris, while glasses might be enough for simple hand sanding. A face shield provides broader protection, which is a smart move if you’re using polishing wheels or working around others.
- Keep the shield/eyewear clean for clear visibility.
- Replace scratched shields or glasses right away—they can worsen visibility and even create visual distortions while you work.
Keeping your eyes safe can rapidly become second nature, and you’ll thank yourself the first time something unexpected bounces toward your face.
Fire Safety For Flame Polishing
Flame polishing introduces open flame into the mix, which raises the risks. Between the torch, flammable supplies, and acrylic’s own tendency to burn if overheated, things can go wrong fast.
Steps to minimize fire hazards:
- Work in a clean, uncluttered area, away from anything flammable (like rags or dust).
- Keep a fire extinguisher or fire blanket nearby, and make sure you know how to use it.
- Never leave a lit torch unattended—even for a few seconds.
- Let the acrylic cool before moving or stacking; recently melted edges might stick to surfaces or ignite lint or debris.
Always treat flame-polishing gear as an active hazard until it’s fully cooled and shut off.
Hand Protection And Ventilation
Acrylic edges can be sharp, and the entire process sends fine dust, fumes, or heat out into your workspace. Buffing compounds and cleaning chemicals also add risk.
- Wear cut-resistant gloves (especially when sanding or if adjusting small acrylic pieces on power tools).
- For flame polishing, use heatproof gloves; even a quick brush against hot acrylic can leave a burn.
- Make sure your work area is well ventilated. Open a window, turn on a fan, or use a dust extractor—don’t rely on a mask alone when fumes are present.
Here’s a quick table summarizing key precautions:
| Safety Aspect | Recommendation |
|---|---|
| Eye Protection | Face shield, safety goggles |
| Fire Safety | Extinguisher at hand, clear area |
| Hand Protection | Cut-resistant/heatproof gloves |
| Ventilation | Open windows, fans, extractors |
Being prepared for accidents doesn’t mean you expect them—it just means you won’t be surprised if they happen.
Taking these steps seriously lets you focus more on the polishing itself and less on potential setbacks or injuries down the road. Plus, you’ll find you work faster and more confidently when you know you’re covered.
Maintaining Your Polished Acrylic
So, you’ve put in the work and got those acrylic edges looking super clear. That’s awesome! But the job isn’t quite done yet. Keeping that shine means a little bit of care after you’re finished. It’s not complicated, but you do need to know what to do and, maybe more importantly, what not to do.
Post-Polishing Cleaning Procedures
After all that buffing and polishing, there’s usually some residue left behind. You’ll want to get rid of that. The best way to clean your acrylic is with a soft cloth and a bit of mild soap and water. You can also find special cleaners made just for acrylic that are good at getting rid of fingerprints and dust without leaving streaks. Just make sure whatever you use is ammonia-free. Stuff like Windex, which has ammonia, can actually damage the acrylic surface over time, making it cloudy or even causing it to crack. So, stick to gentle cleaners.
Preventing Scratches On Finished Edges
This is a big one. Those beautiful, clear edges are pretty vulnerable to scratches. Think about where you’re placing your acrylic piece. Avoid sliding it across surfaces, especially rough ones. When you’re moving it, try to lift it instead. If you’re stacking pieces, put a soft cloth or felt between them. For everyday cleaning, use a soft microfiber cloth. If you notice any light scratches, there are specific acrylic polishes, like Novus 1, 2, or 3, that can help buff them out. It’s all about being gentle.
Long-Term Care For Clarity
To keep your acrylic looking its best for a long time, a few simple habits go a long way. Regular, gentle cleaning is key. Avoid harsh chemicals and abrasive materials. If your acrylic piece is going to be exposed to a lot of sunlight, consider that UV rays can sometimes degrade plastics over extended periods, though most modern acrylics have good UV resistance. For pieces that need to be super clear, like for displays or signage, you might want to look into professional edge polishing services periodically, especially if the piece gets a lot of handling. It’s a bit like taking care of a car; regular maintenance keeps it looking new.
Here’s a quick rundown of what to use and avoid:
- Use: Mild soap and water, specialized acrylic cleaners, microfiber cloths.
- Avoid: Ammonia-based cleaners (like Windex), abrasive pads, rough cloths, sliding the acrylic.
Taking a little extra time to clean and protect your polished acrylic edges will make a big difference in how long they stay looking great. It’s the small steps that count when it comes to keeping that crystal-clear finish.
Keeping your shiny acrylic looking its best is simple! A gentle wipe with a soft cloth usually does the trick. For tougher spots, a mild soap and water solution works wonders. Want to learn more about keeping your acrylic in top shape? Visit our website for detailed guides and tips!
Finishing Touches for Your Acrylic Projects
So, you’ve gone through the steps to get those acrylic edges looking sharp. Whether you used sandpaper, a buffing wheel, or even a flame, the goal is always that smooth, clear finish. It’s not just about making things look good, though. Properly finished edges are safer to handle and make your whole project look more professional. With a little practice and the right tools, you can get those edges looking like glass every time. Keep at it, and your acrylic creations will really shine.
Frequently Asked Questions
What’s the easiest way for a beginner to make acrylic edges shiny?
For starters, sanding and then buffing is your best bet. Begin with rough sandpaper, then move to finer grits. Finally, use a buffing wheel to get that shiny, glass-like look.
Can flame polishing replace sanding and buffing?
Flame polishing can make edges shiny really fast. But, if your edges are rough or have deep scratches, you still need to sand them first. Flame polishing is best used after sanding to add that final shine.
Why do my acrylic edges look foggy after sanding?
It’s totally normal for acrylic edges to look foggy or frosted after sanding. This happens because sanding creates tiny scratches. The next steps, like buffing or flame polishing, get rid of these scratches and bring back the clear look.
What basic tools do I need to polish acrylic edges at home?
You’ll need sandpaper (from coarse to fine grit), a soft buffing wheel, and polishing compound made for acrylic. Using water while sanding helps a lot. If you want to try a more advanced method, a torch for flame polishing can be used, but always remember safety gear like gloves and goggles.
How can I stop the acrylic from melting when I polish it?
Don’t push too hard when buffing or using a flame. Keep your movements smooth and steady. When sanding, use water to keep things cool. Never hold the acrylic in one spot for too long, as this can cause it to overheat and melt.
What’s the difference between sanding, flame polishing, and diamond polishing?
Sanding is the basic step to smooth rough edges. Flame polishing uses a quick flame to melt and smooth the surface for a glossy finish. Diamond polishing is a high-tech method that gives the smoothest, clearest, mirror-like edge, perfect for professional looks.